CLEAN UV · ARM KIT V2.1
Custom arms
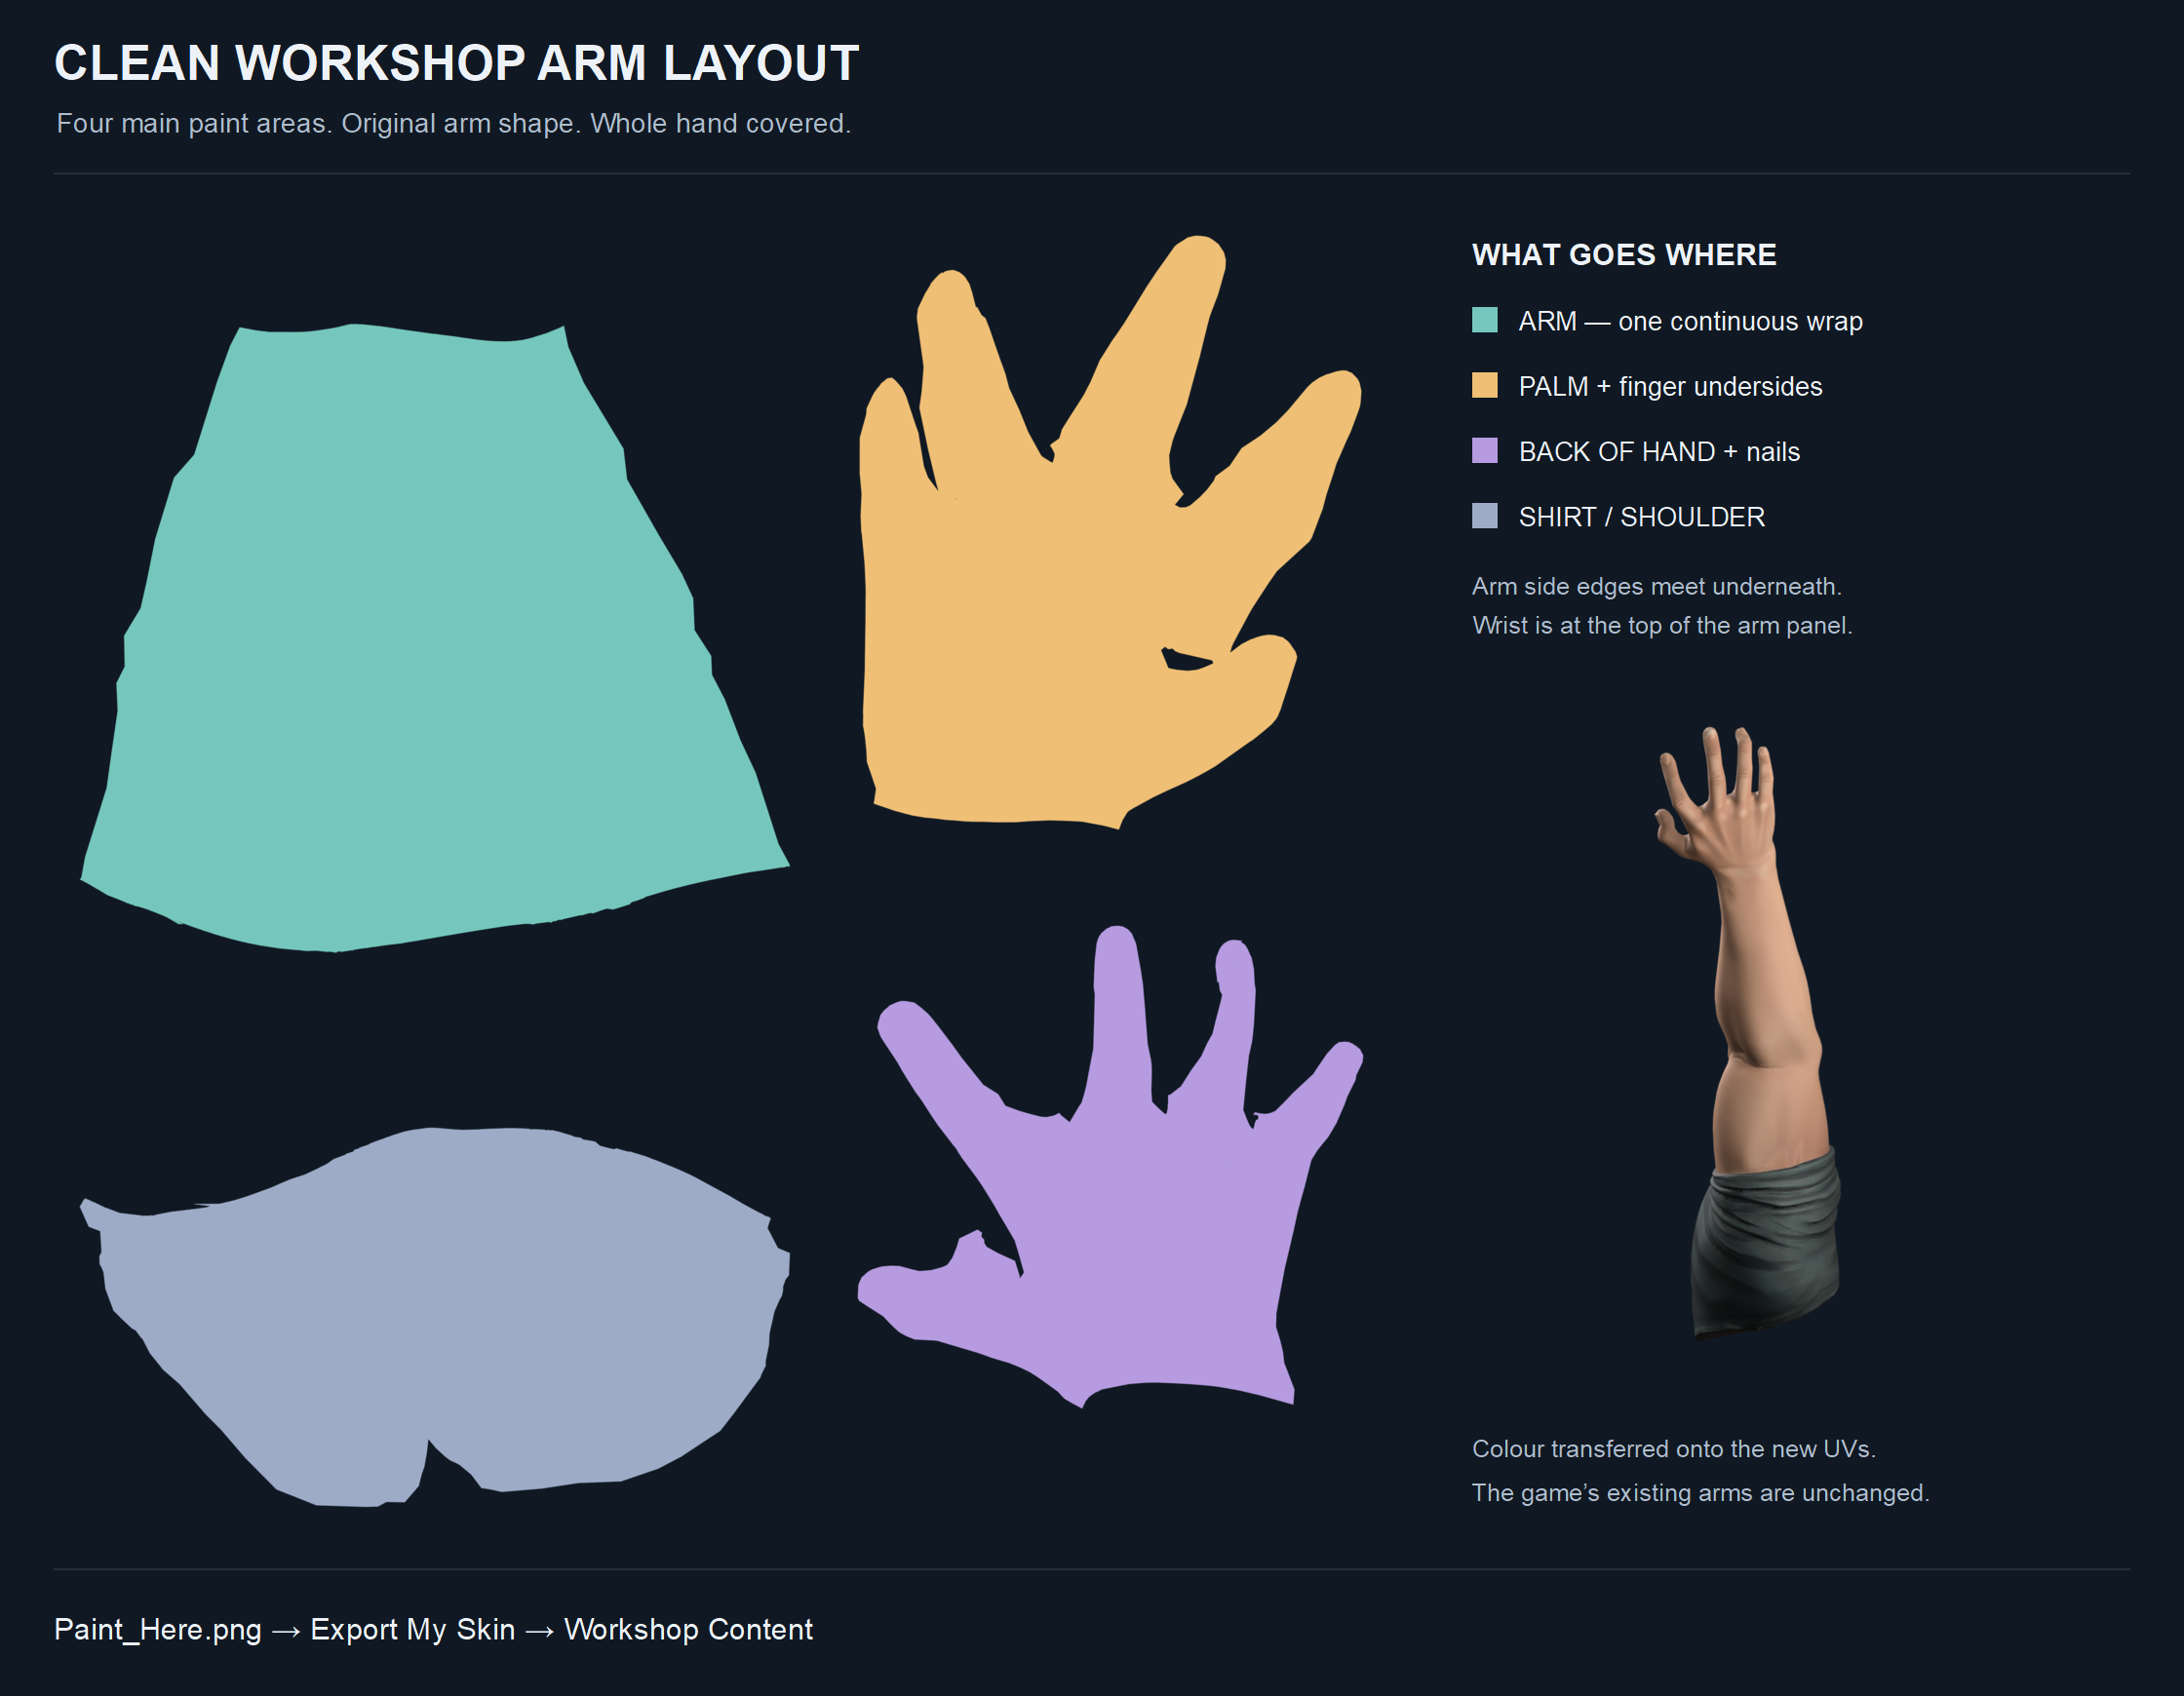
Four main painting areas. Original arm shape, skeleton and animation clips.
Download arm kit ZIP ↓BALL SCRATCH SIMULATOR / WORKSHOP
Paint your own arms and pants. Start with a ready-to-paint template, keep the original shape, and turn your design into a Workshop cosmetic.
New: multiplayer texture exports. All four downloads now generate textures for the standard multiplayer character. Both players need the same updated Workshop item installed and a compatible game version. Missing items use standard clothes. Live Steam multiplayer verification is still pending.
CLEAN UV · ARM KIT V2.1
Four main painting areas. Original arm shape, skeleton and animation clips.
Download arm kit ZIP ↓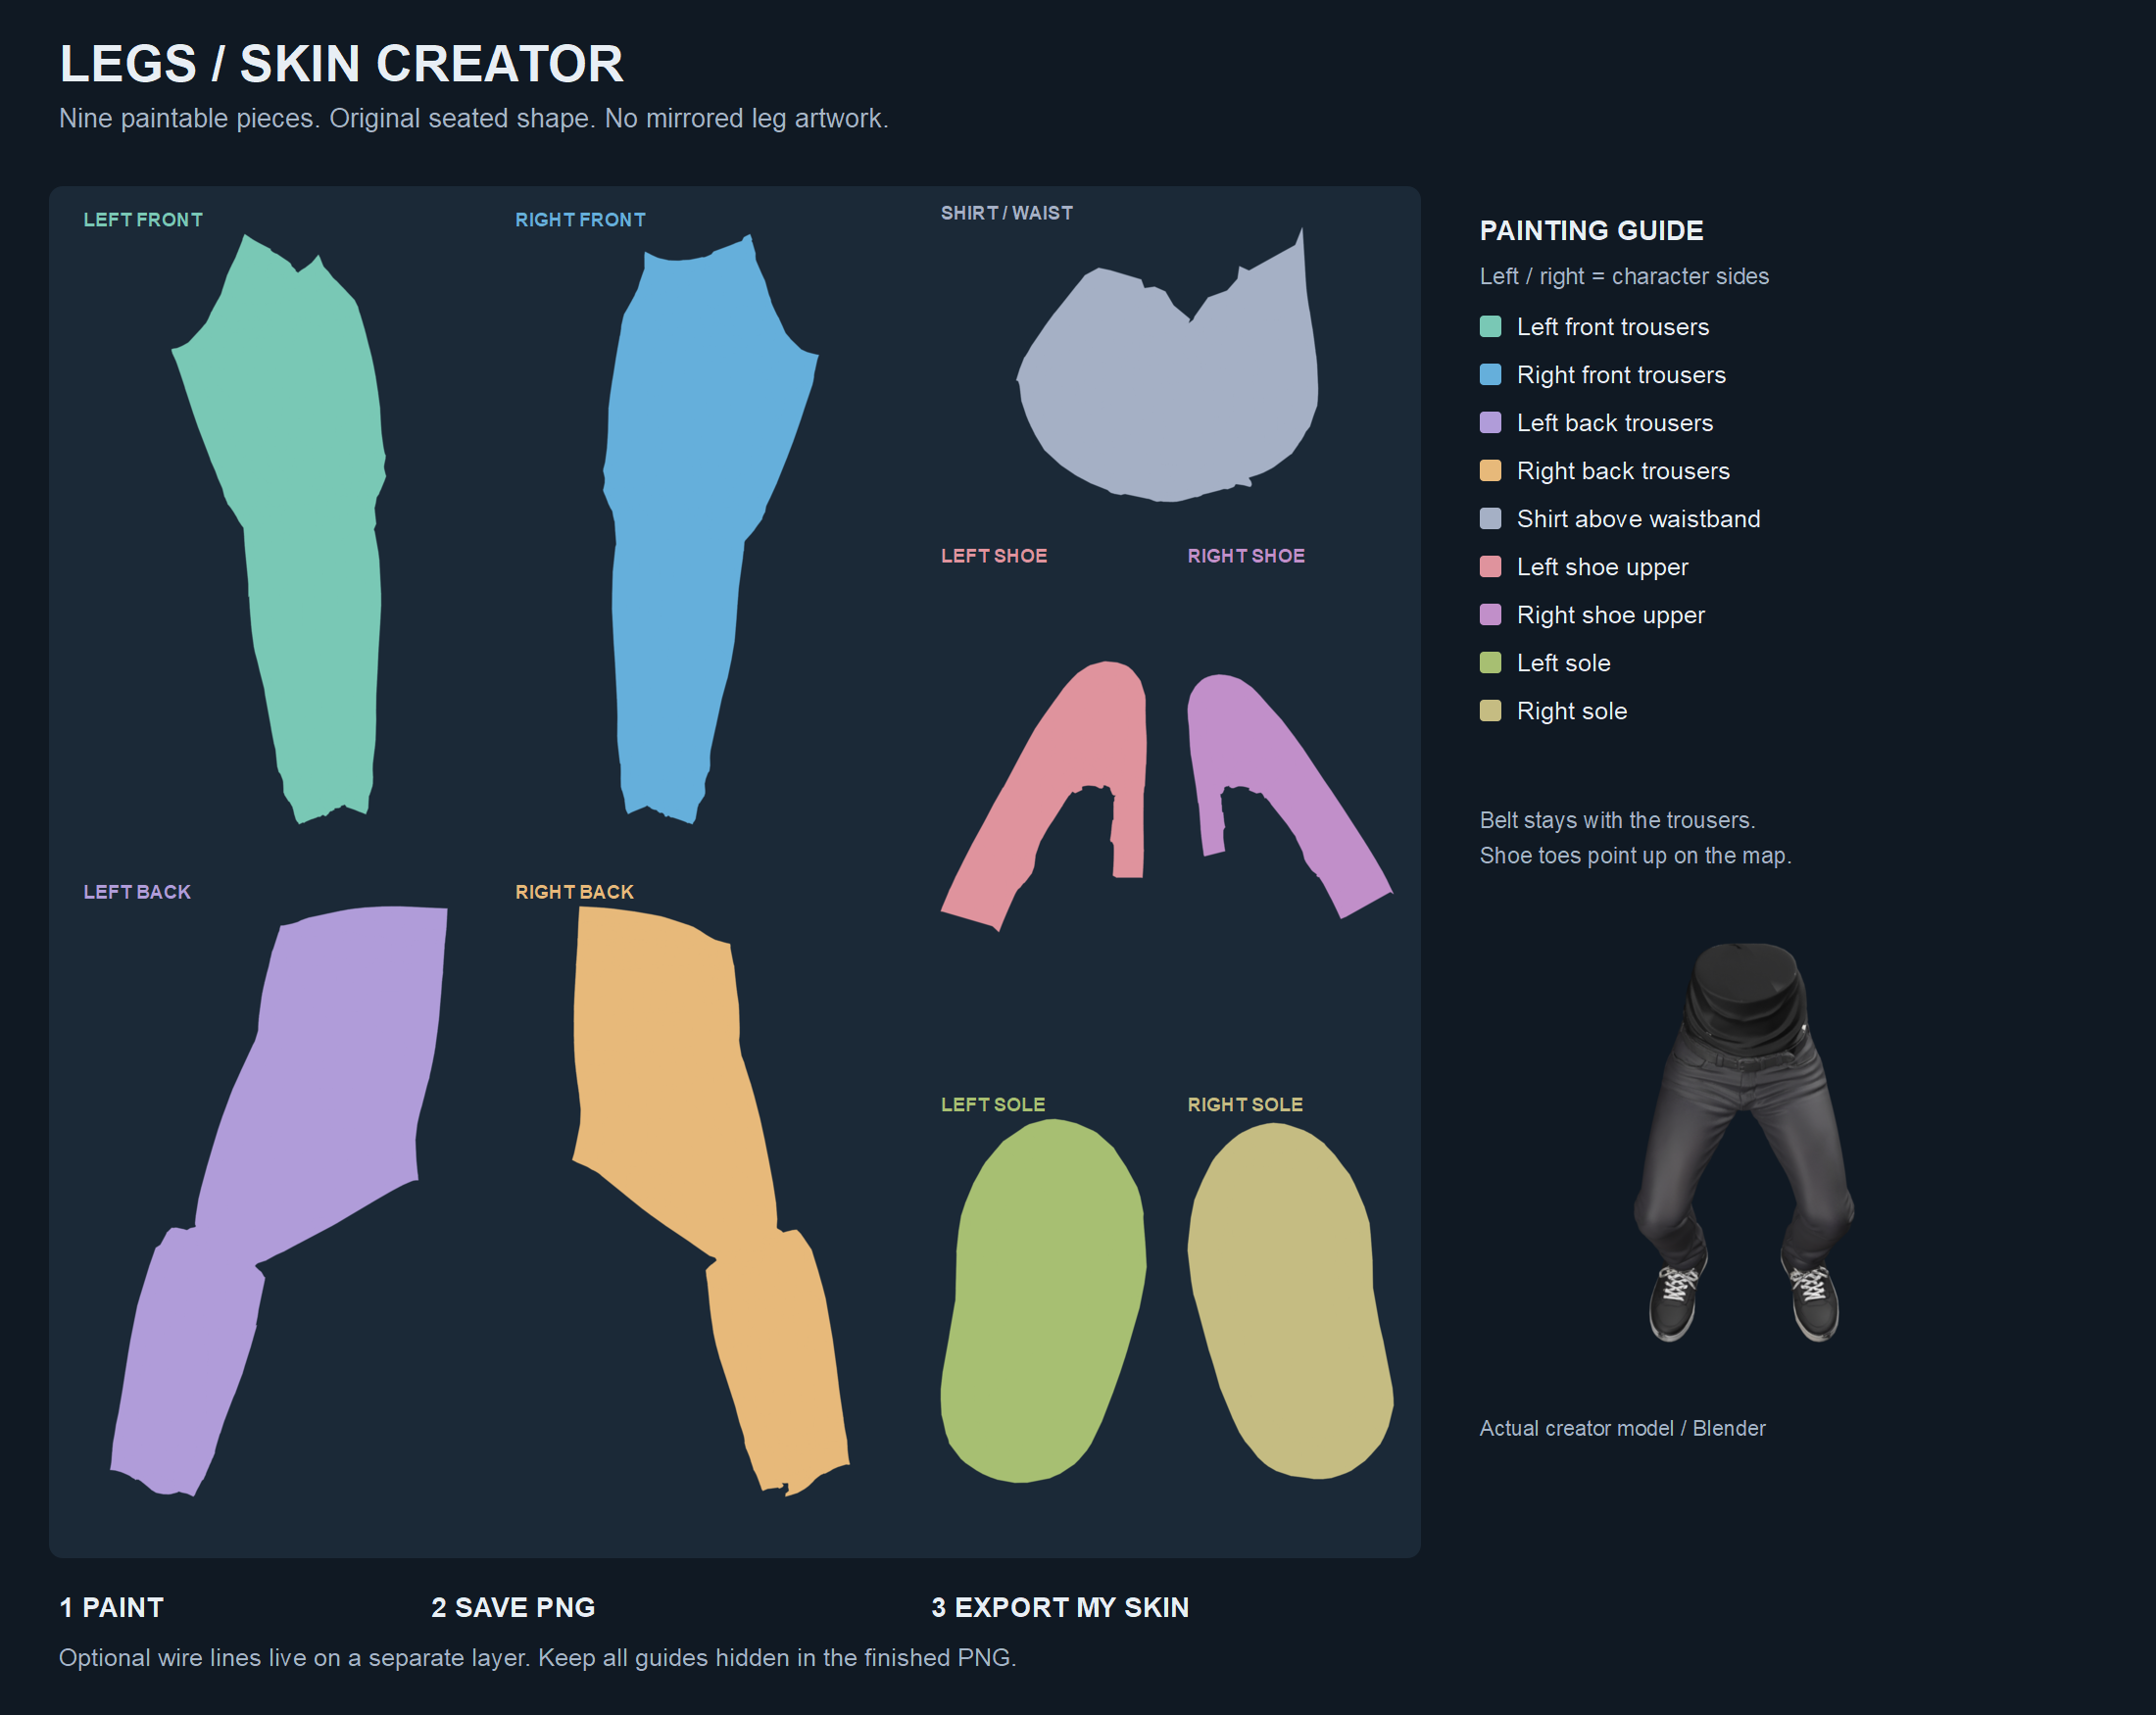
CLEAN UV · PANTS KIT V1.1
Separate left and right artwork. Original seated legs, shoes and shirt edge.
Download pants kit ZIP ↓Both kits include a PNG canvas, layered OpenRaster template, masks, layout guides, Blender painting file and Windows export helper. Extract the ZIP before using it. The helper only packages files locally.
Keep the template and model together. These are new painting layouts. Their PNGs do not fit the old game models. The supplied helper embeds the correct creator model automatically.
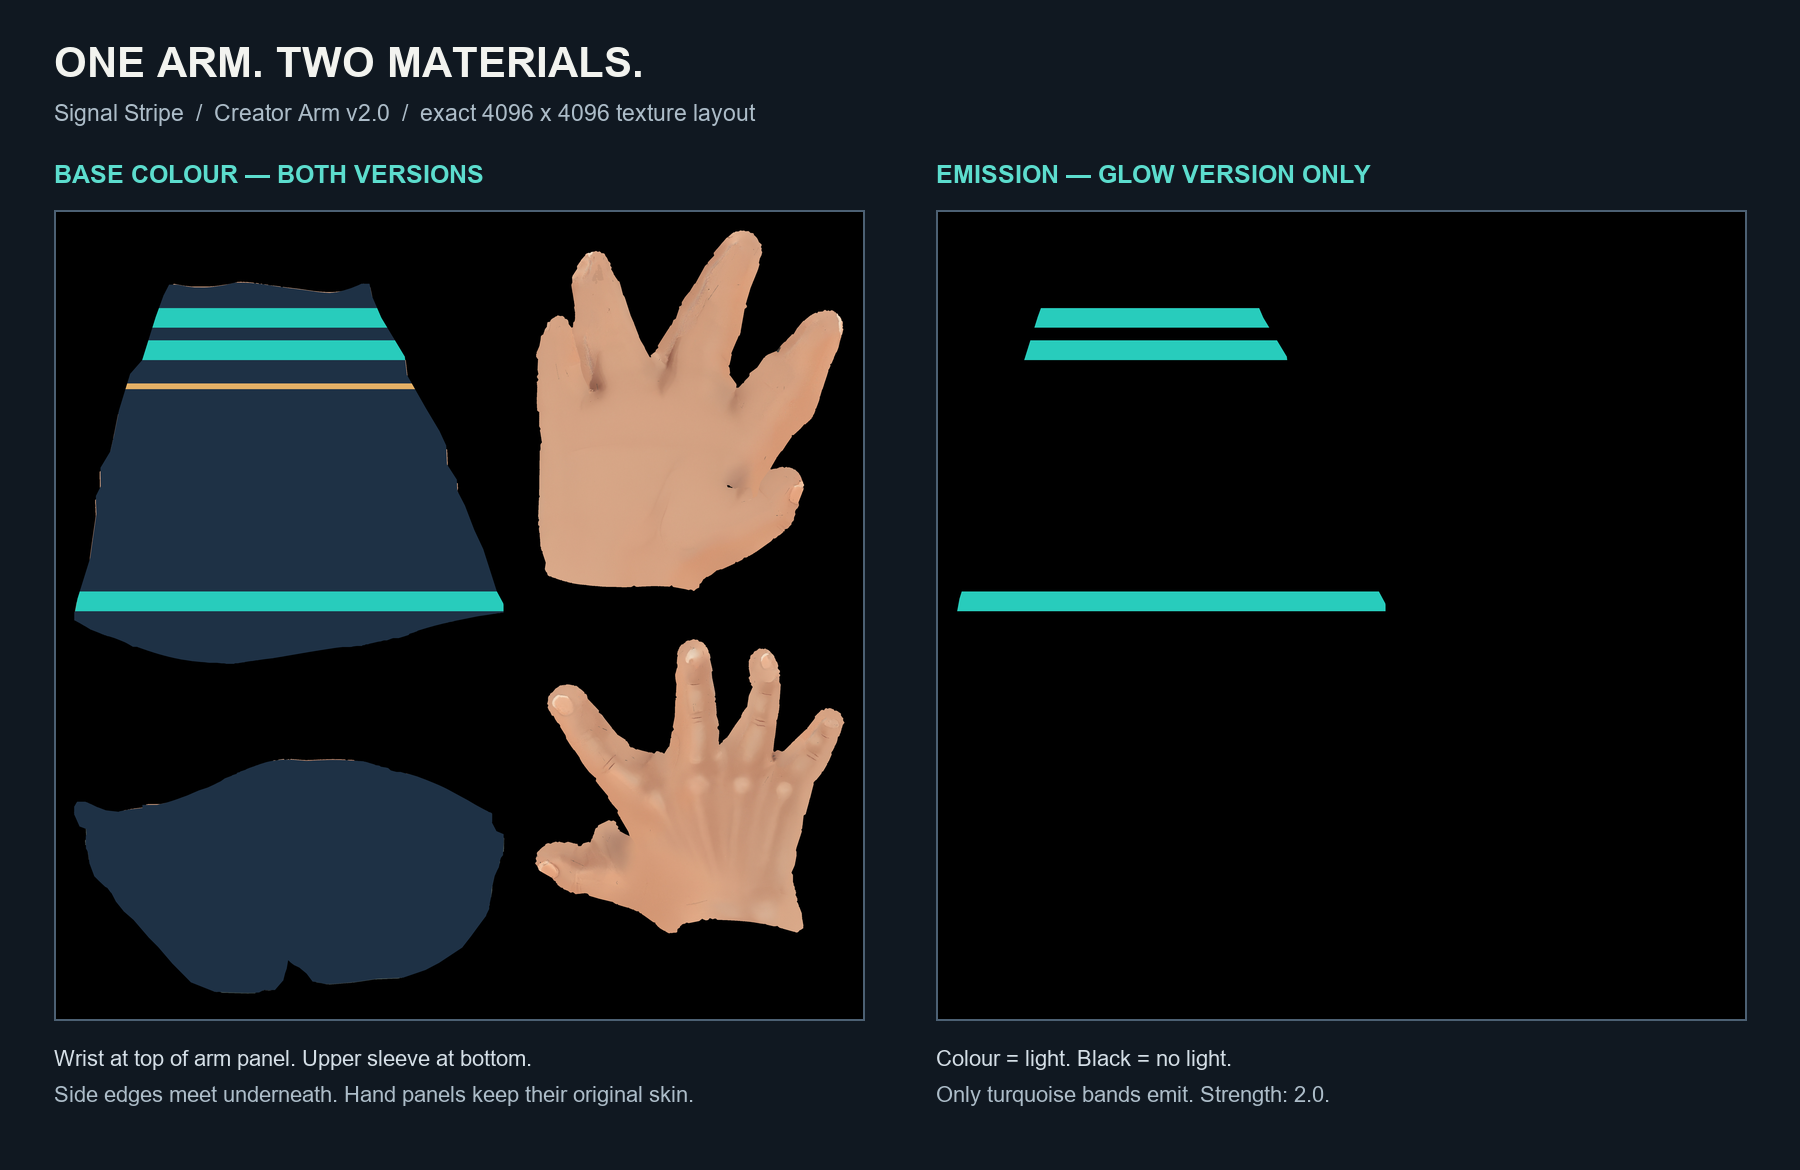
Meet Signal Stripe: a navy sleeve with turquoise bands. Both versions use the arm kit's exact texture layout and keep the original hand and scratch animation.
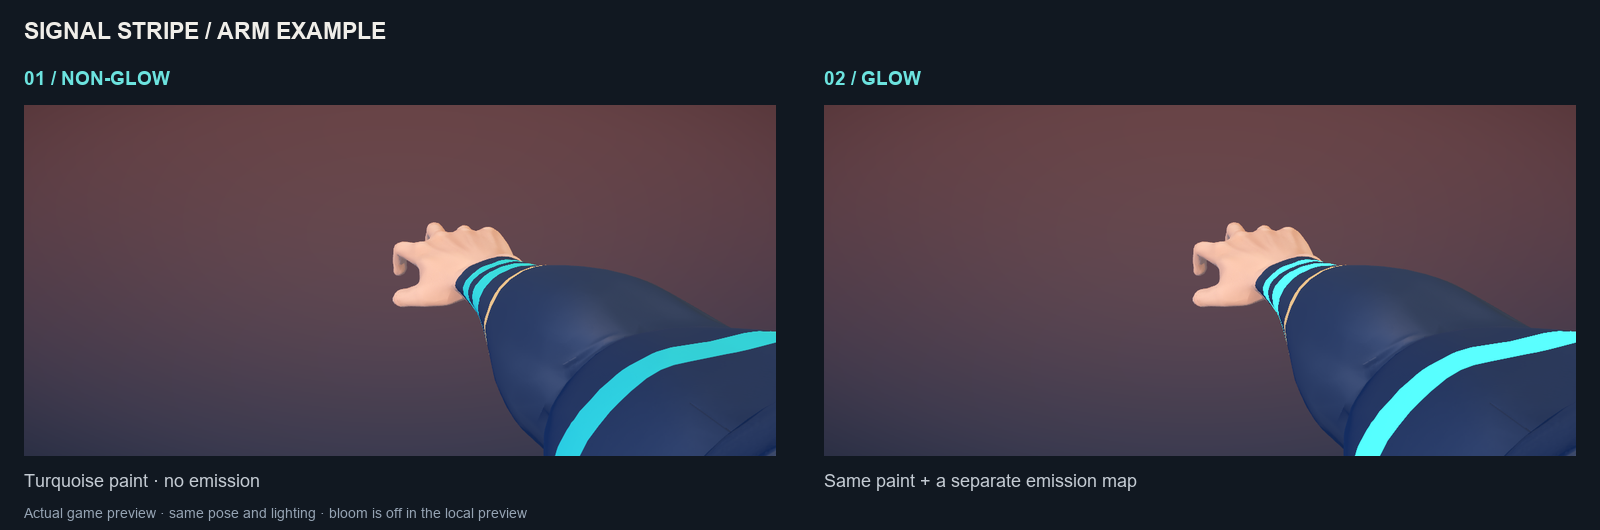
Includes two finished Workshop packages, Blender painting files, layered artwork, colour and emission PNGs, exact masks and layouts, Windows export shortcuts, and game previews. Read START HERE.md after extracting.
Edit Paint_Here.png, then run Export Non Glow.cmd. The turquoise areas are ordinary paint, with no emission.
Edit Emission.png in the same layout. Black means no glow; the coloured bands emit. Run Export Glow.cmd. The game adds a subtle 4.5-second brightness cycle automatically.
The movement uses the arm's existing scratch clip. Only the glow version changes emission brightness. Bloom in gameplay depends on your graphics settings and scene lighting; the included gameplay screenshots show it with and without bloom.
To try a finished example, open Outfits → Workshop → Upload Cosmetic, choose its Non Glow/Workshop Content or Glow/Workshop Content folder, and select Test locally. Switch between Idle and Scratch. After your own edits, export again and select Reload files.
Make it your own. These are reusable learning examples. Give your design new artwork and a new name before sharing it. Upload only the finished Workshop Content folder, not the full download.
Signal Stripe trousers pair navy cloth with turquoise accents down the knees and shins. Try ordinary paint and a steady glow, using the exact Legs Creator v1.0 layout.
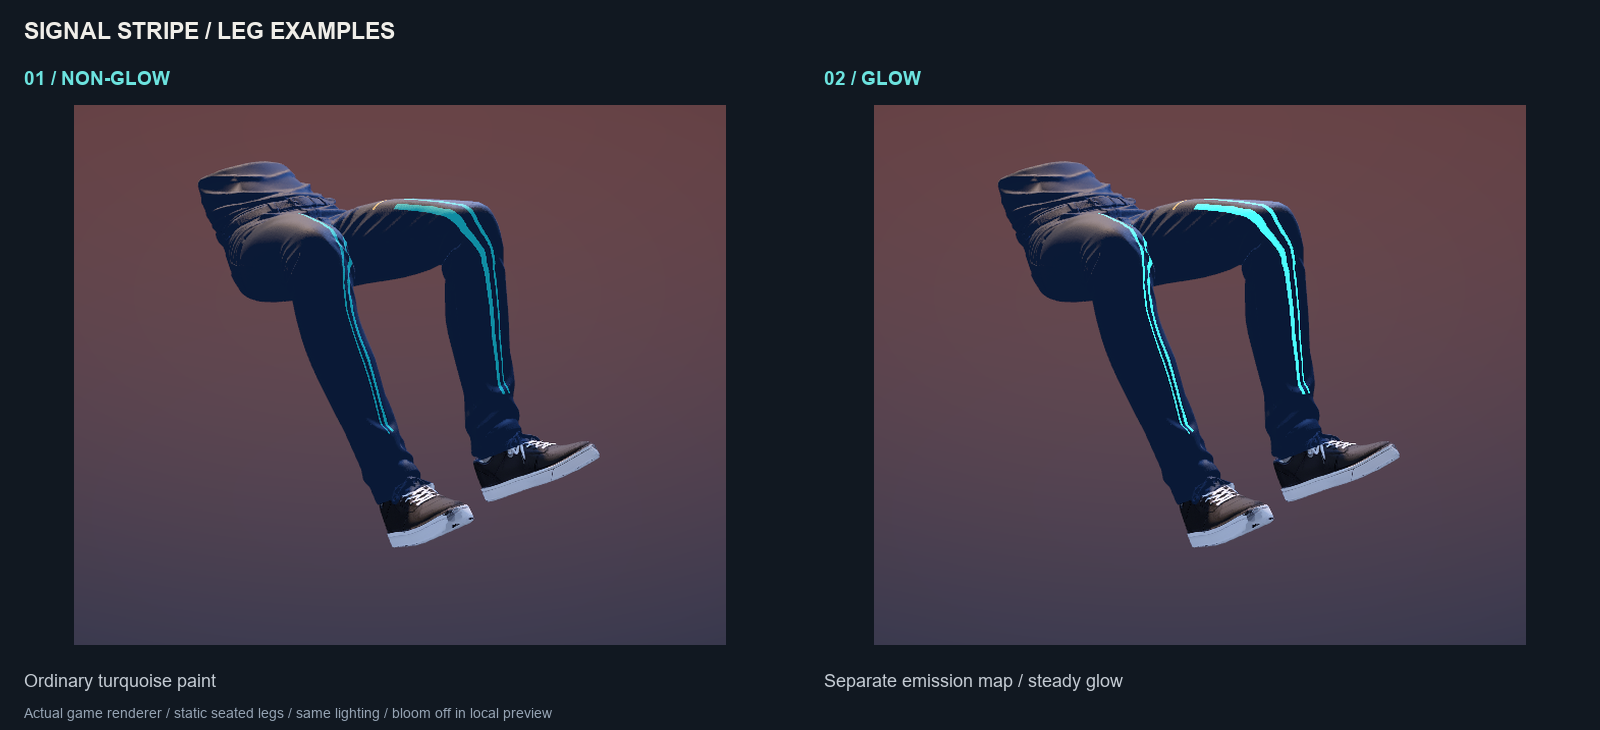
Includes two finished Workshop packages, editable Blender projects, layered artwork, colour and emission PNGs, all nine part masks, labelled layouts, export shortcuts and game screenshots. The matching arm examples are a separate download.
Edit Paint_Here.png and run Export Non Glow.cmd. The turquoise stripes and warm markers are ordinary paint. The original shoes remain unchanged.
Edit the separate Emission.png, leaving everything except the accents black, then run Export Glow.cmd. This produces a steady glow at strength 2.0. Workshop legs do not automatically pulse like the arms.
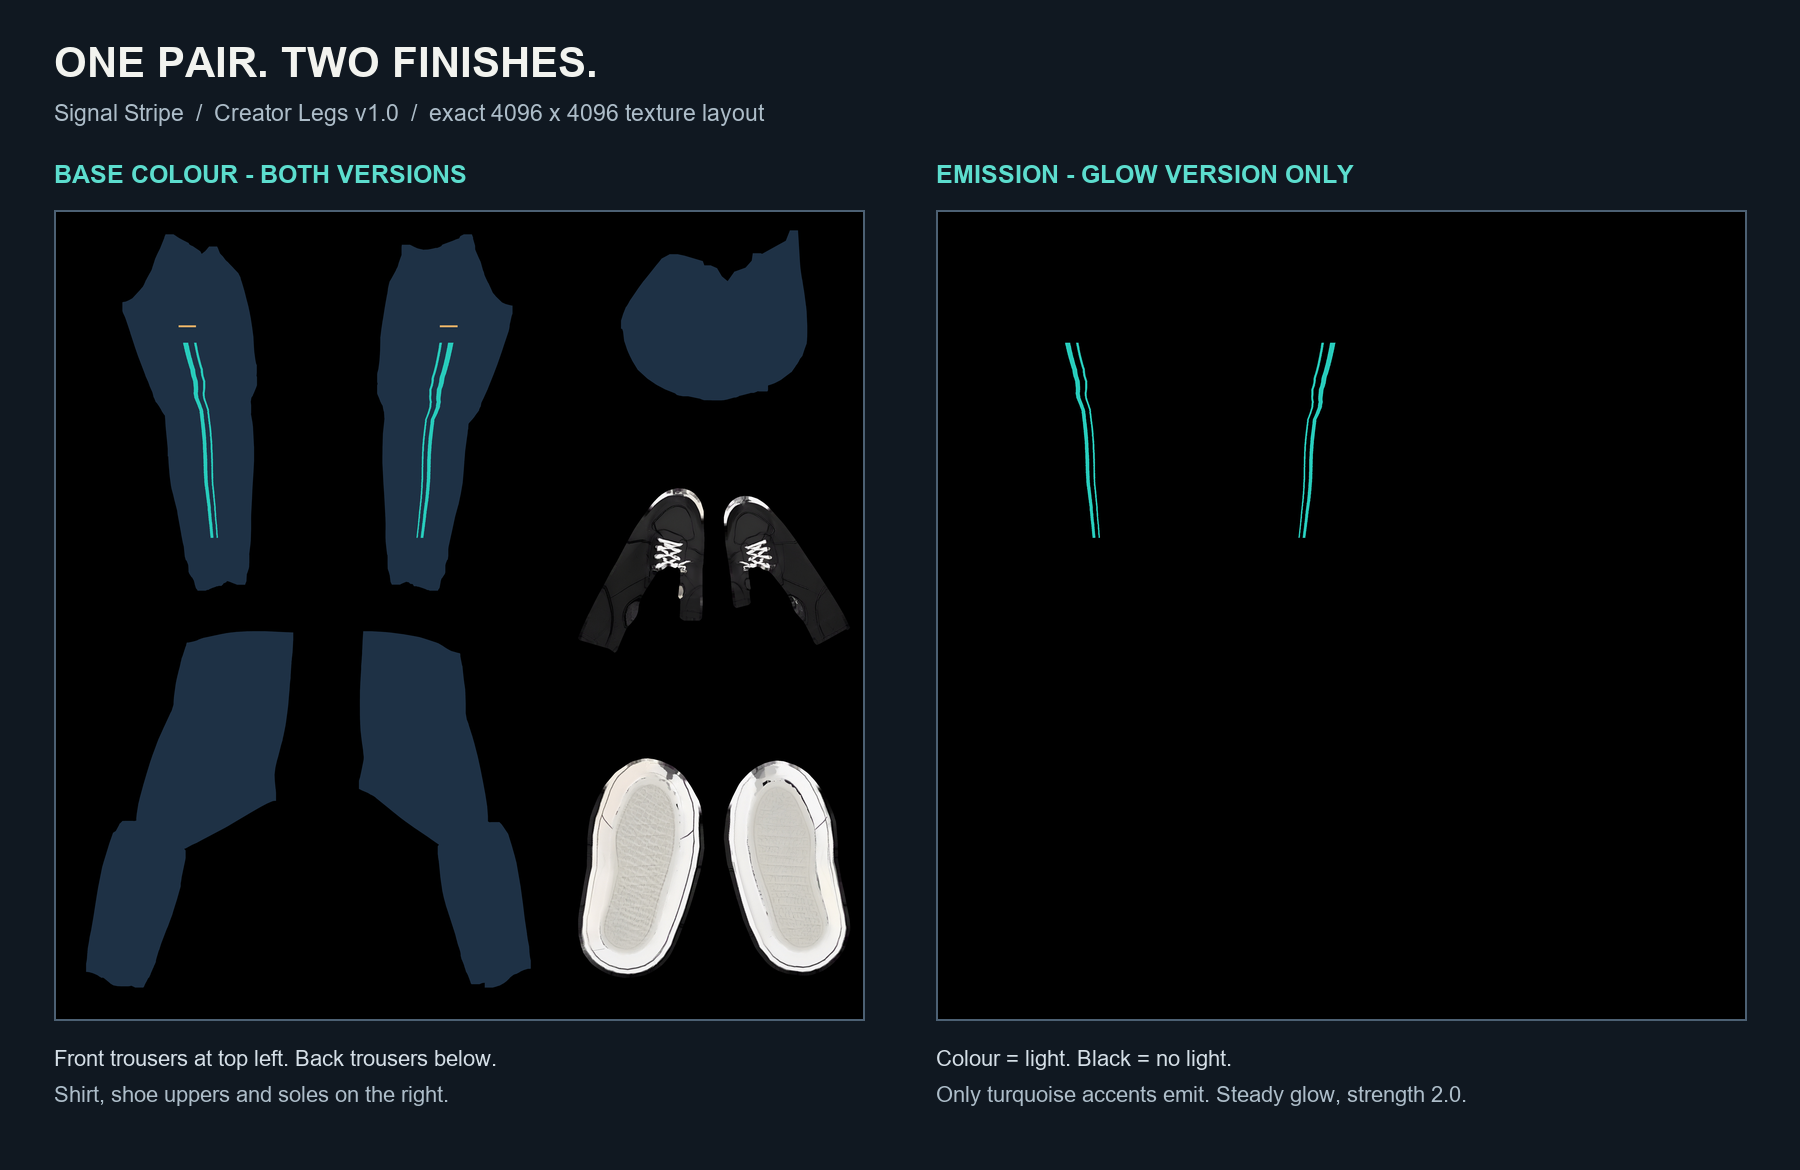
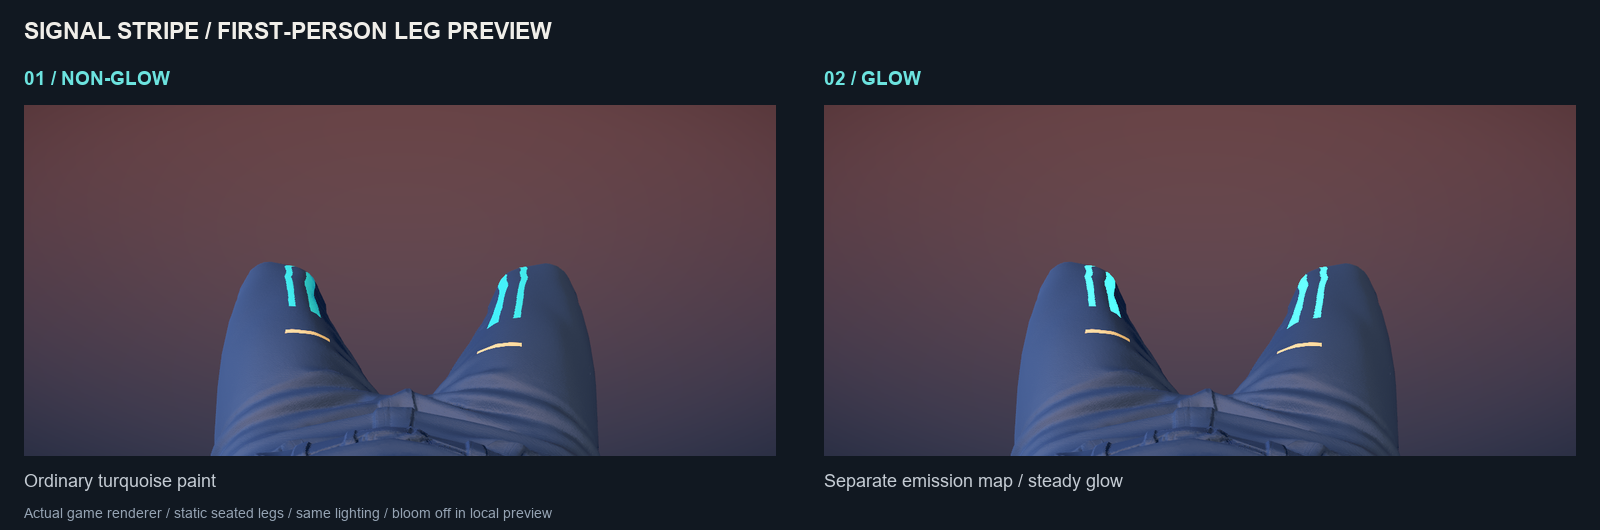
Open Outfits → Workshop → Upload Cosmetic, select Non Glow/Workshop Content or Glow/Workshop Content, and choose Test locally. After editing and exporting, select Reload files.
Legs keep their seated pose. This model has no skeleton or animation clips, so Idle and Scratch are disabled for leg previews. The glow is a material effect. Keep the model and texture layout together, and inspect the knee folds, cuffs and seams before sharing your own design.
Extract the kit to a normal folder. Keep a separate folder for every cosmetic so that exporting one design does not replace another.
Open Paint_Here.png, or the layered .ora file in an OpenRaster-compatible editor. Use the labelled layout and masks to find each surface. Do not crop, move, rotate or resize individual panels.
Hide all guides. Export over Paint_Here.png as an 8-bit RGB/RGBA PNG, at 4096 × 4096 or 2048 × 2048. Leave about 16–24 pixels of matching colour outside seams at 4K.
Open the kit's Model/Paint_Workshop_*.blend file. Reload the painted image after external edits, or paint directly on the model. Save the image itself—not just the Blender file. For a basic reskin, leave the rig and mesh unchanged.
On Windows, run Export My Skin.cmd. It writes Workshop Content/cosmetic.glb, bss_cosmetic.json and multiplayer_albedo.png. Glow example exports also write multiplayer_emission.png. Keep these generated files together. Edit the manifest's display_name to name your design. Re-exporting keeps that name.
The original arm and pants starter exporters replace base colour only. For worked emission examples, use the Signal Stripe arm or leg download and its glow exporter. Metal, transparency and replacement meshes need separate model/material authoring. PNG transparency alone does not enable a transparent material.
Open Outfits → Workshop → Upload Cosmetic. If this button is missing, update the game through Steam.
Choose the exported Workshop Content folder—not the full creator kit. Keep the manifest, model, generated multiplayer PNGs and optional thumbnail inside it.
Choose a separate PNG or JPEG preview under 1 MiB. Show the cosmetic on its model, not its unfolded texture sheet. Use a clear, all-ages product view.
Select Test locally. Check the model, seams and materials; use Idle / Scratch for arms. After re-exporting, choose Reload files. This preview does not publish anything or change your saved outfit.
Confirm you have the rights to share the artwork, then select Upload / Update Privately. Accept Steam's Workshop agreement yourself if prompted.
Open the item page, subscribe and test it in-game. Check first-person framing, seams, hand animation and lighting. Only make it public from Steam after reviewing it.
Updating a skin: reuse the same content folder and Steam account. The uploader remembers its item ID, so retries update that item. Uploads and updates through this tool are private for review. If an upload response is delayed, check your Workshop items before retrying from a different folder.
Open the Steam Workshop ↗The Workshop may remain developer-only during integration. Voting on a creator submission does not promise inclusion in the game, payment or a store listing.
Use the creator kit's model with its own template. Do not put this PNG onto an older model. Keep the entire square canvas and all panels in place, then export with the supplied helper.
Extend matching paint a little beyond each panel edge. Check the wrist, finger sides, trouser seams and shoes in Blender. Tiny text across deep folds will distort even with a correct export.
Game lighting, roughness, normal maps and glow settings affect the result. Check the exported GLB, not only the painting file. The original starter helper changes colour only. The Signal Stripe glow helper also embeds a separate emission map at strength 2.0; changing Blender's preview strength alone does not change its export.
The local upload preview has no bloom. Emission still makes the selected surfaces brighter. A halo depends on the game's bloom setting and scene lighting. Keep the non-emitting areas black in Emission.png, and check the result in a level as well.
Use the updated game and keep the manifest, self-contained GLB and generated multiplayer PNGs in Workshop Content. The GLB must be no larger than 128 MiB and must embed its first-person images and buffers. Paths outside the package and unrelated files are not accepted. Arms use Player Arm v1; pants use Player Legs v1.
Yes, with the multiplayer-supporting game version, if they have the same updated Workshop item subscribed and installed. Re-export older designs with these tools and update the existing listing from its existing content folder. Missing items or older uploads without multiplayer textures show standard clothes. The game uses the standard character shape; small patterns can stretch when transferred. Joining a lobby does not automatically subscribe to or download another player's outfit.
Let Steam finish downloading, then use Refresh in Outfits. Check for a failed-download message. When an item is missing, the original cosmetic is used temporarily and your saved choice is retained.
Start with reskins. Custom meshes need to preserve the game's shape, scale and rig expectations; beginner support and detailed validation are not ready. Waifu imports are not enabled in this creator release. Free Workshop subscriptions and official paid Steam inventory cosmetics are separate. Adding glow does not automatically make your upload a paid item.
Use artwork you created or have permission to distribute. Do not redistribute premium game textures. Keep characters adult and fully clothed, and keep public previews free of nudity, suggestive framing and realistic gore. Follow Steam's Workshop rules.